


Hello, Today i was installing Flutter on my new new laptop, so this is great time to write this article. It's very useful for those who are beginner in flutter or install Flutter first time on your machine.
What is Flutter?
Flutter is Google’s mobile app SDK for crafting high-quality native interfaces on iOS and Android in record time. Flutter works with existing code, is used by developers and organizations around the world, and is free and open source. It uses Dart as main programming language.
Why Flutter?
Flutter contains elements from both Android and iOS, but unlike React Native, all elements, or “widgets”, are usable on both platforms. An app can now look exactly the same on both platforms instead of adopting platform specific looks.
“iOS and Android in record time” : The same code-base is usable for both Android and iOS apps reducing the need for separate development for Android and iOS. “But couldn’t we do the same in React Native?” Yes, but because React Native pulls interface elements from the device, a lot of elements were platform specific, rendering a single code-base to be larger than it needs it be.
Get the Flutter SDK
The first step is to start your computer(😁 Just Kidding) and download Flutter SDK from flutter.dev/docs/get-started/install. You need to have git installed for flutter to work.
Step 1:
Download the file and place it in your C:/ directory in a newly created folder titled src, extract the file. The path would look something like this C:/src/flutter and extract it there.
Step 2:
If you have git installed you can just clone the repository in the newly created folder src in your C:/ directory (This is little bit tricky) by running this command.
git clone https://github.com/flutter/flutter.git -b stable
How to make dark mode in your personal website using only 1 CSS property. Dark mode made simple
Updating your path
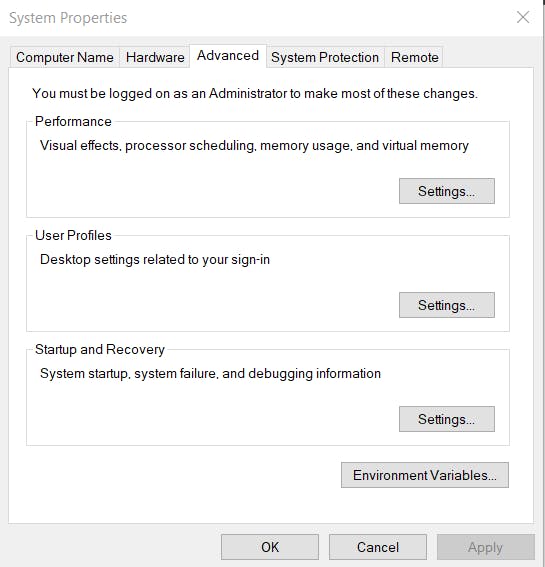
By updating path in Edit the system environment variables for Flutter SDK, you can use the Flutter SDK in command prompt or git terminal form any directory we want. Go to start search bar and type env, which would give you the setting for “Edit your System Environment variable” select it to have a new window opened as shown below and click on the Environment variables to add a new path for flutter.
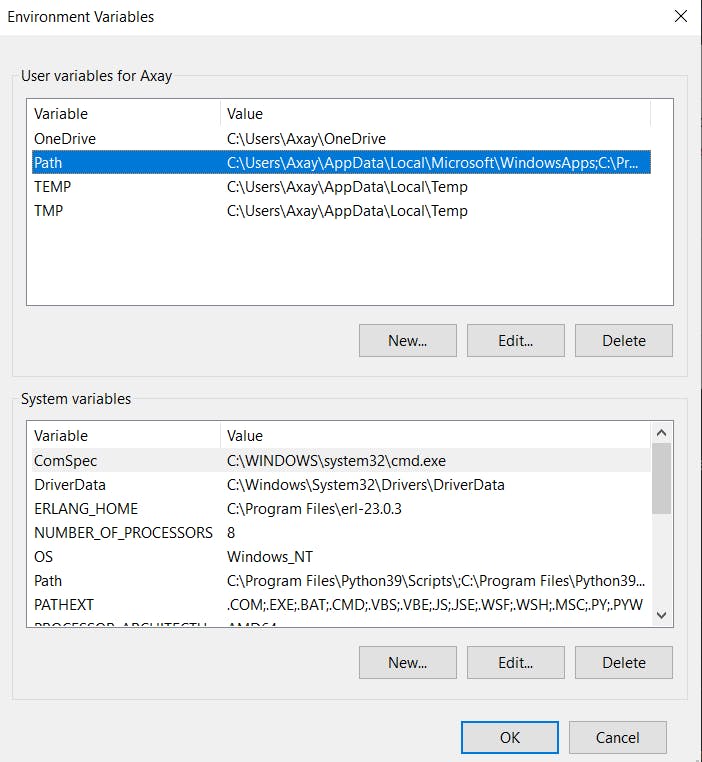
 After you’ve clicked on the button, you would see a new window, click on the path and click on the edit button just like I’ve done in the image below and that would open another window.
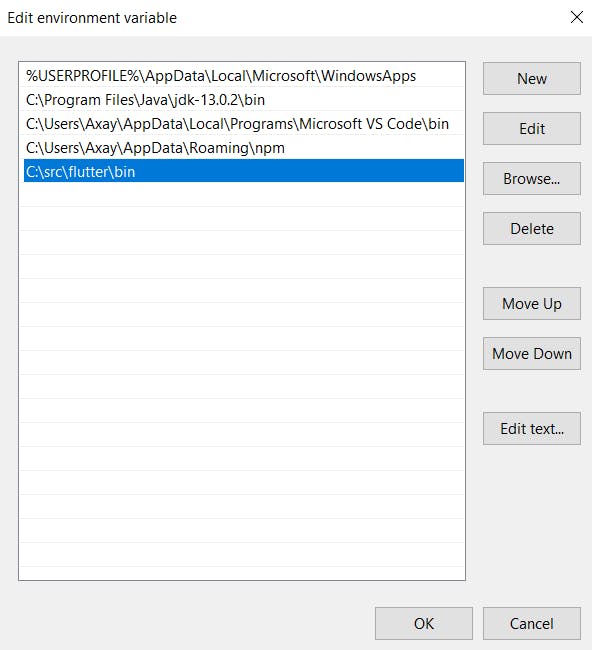
 In this window just click the new button and add the path for flutter as per below given image. Your path should be C:\src\flutter\bin. After you’ve done all the hard part, Close all of these windows by clicking on the ok button.
Run Flutter Doctor
From a console window that has the Flutter directory in the path (see above), run the following command to see if there are any platform dependencies you need to complete the setup:
C:\src\flutter>flutter doctor
This command checks your environment and displays a report of the status of your Flutter installation. Check the output carefully for other software you might need to install or further tasks to perform (shown in bold text).
For example:
[-] Android toolchain - develop for Android devices
    • Android SDK at D:\Android\sdk
    ✗ Android SDK is missing command line tools; download from https://goo.gl/XxQghQ
    • Try re-installing or updating your Android SDK,
      visit https://flutter.dev/setup/#android-setup for detailed instructions.
The following sections describe how to perform these tasks and finish the setup process. Once you have installed any missing dependencies, you can run the flutter doctor command again to verify that you’ve set everything up correctly.
Install Android Studio
We do not need to write code on android studio we can do it on VS Code as well by just installing flutter extension.
- Download and install Android Studio.
- Start Android Studio, and go through the ‘Android Studio Setup Wizard’. This installs the latest Android SDK, Android SDK Command-line Tools, and Android SDK Build-Tools, which are required by Flutter when developing for Android.
After installing an android studio if you run the flutter doctor -v, if you see some thing that needed to be taken care just follow the step shown in terminal. To resolve the android toolchain issue with android licenses not accepted. just run the command flutter doctor — android-licenses and keep on accepting the licenses.
Set up your Android device
To prepare to run and test your Flutter app on an Android device, you need an Android device running Android 4.1 (API level 16) or higher. follow this steps given in flutter docs.
- Enable Developer options and USB debugging on your device. Detailed instructions are available in the Android documentation.
- Windows-only: Install the Google USB Driver.
- Using a USB cable, plug your phone into your computer. If prompted on your device, authorize your computer to access your device.
- In the terminal, run the flutter devices command to verify that Flutter recognizes your connected Android device. By default, Flutter uses the version of the Android SDK where your adb tool is based. If you want Flutter to use a different installation of the Android SDK, you must set the ANDROID_SDK_ROOT environment variable to that installation directory.
Installing flutter packages in VS Code
Open Vs code go to extensions and type flutter & install flutter package this also install dart package as well.
Set up the Android emulator
To prepare to run and test your Flutter app on the Android emulator, follow these steps (You must have good internet connection to download emulator which is approximate of 2GB in size):
- Enable VM acceleration on your machine.
- Launch Android Studio, click the AVD Manager icon, and select Create Virtual Device…
In older versions of Android Studio, you should instead launch Android Studio > Tools > Android > AVD Manager and select Create Virtual Device…. (The Android submenu is only present when inside an Android project.) If you do not have a project open, you can choose Configure > AVD Manager and select Create Virtual Device…
- Choose a device definition and select Next.
- Select one or more system images for the Android versions you want to emulate, and select Next. An x86 or x86_64 image is recommended.
- Under Emulated Performance, select Hardware - GLES 2.0 to enable hardware acceleration. Verify the AVD configuration is correct, and select Finish.
For details on the above steps, see Managing AVDs.
In Android Virtual Device Manager, click Run in the toolbar. The emulator starts up and displays the default canvas for your selected OS version and device.
Thanks for reading this article, if you want any help for installing these apps let me know in comment section or find me on Twitter.